By IMAGE
18th Jun 2015
18th Jun 2015

Layer Cakes Lemon Raspberry and Rose
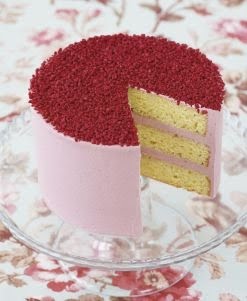
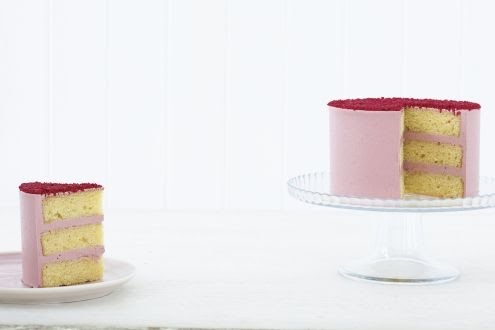
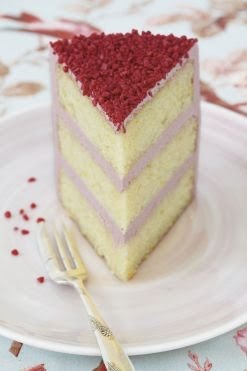
Peggy Porchen’s Lemon, Raspberry and Rose Cake
This is a lovely flavour combination that works really well for a summer occasion such as a garden tea party. For a contemporary look, I have colour-blocked the top of the cake with a layer of rose petal fragments. If you prefer a more traditional design, you could recreate the cake shown on the cover instead.
Makes one 15cm cake, serving 8 generous slices.
INGREDIENTS
For the lemon sponge
200g salted butter
200g caster sugar
zest of 2 unwaxed lemons
4 medium eggs, at room temperature
200g self-raising flour, sifted
For the lemon syrup
150ml lemon juice
150g caster sugar
For the raspberry meringue buttercream
270g caster sugar
67ml water
135g egg whites
330g butter
160g raspberry pur?e
raspberry extract (to taste)
For the decoration
about 3 tbsp rose petal fragments, glazed icing sugar and fresh raspberries (for cover design only)
EQUIPMENT
baking tool kit (see below)
layering tool kit (see below)
three 15cm round sandwich tins
For cover design only:?Peggy’s cake stencil piping bag?(included with her new book, Love Layer Cakes)
medium star piping nozzle
METHOD
Make the sponge one day ahead.
To make the lemon sponge
Preheat oven to 175?C/gas mark 4. Line three 15cm sandwich tins with oil spray and greaseproof paper. Place butter, caster sugar and lemon zest in an electric mixer and, using the paddle, beat at medium-high speed until pale and fluffy. Lightly beat eggs in a separate bowl or jug and, with the mixer set at medium speed, slowly pour into the mixture. If it starts to curdle, add a tablespoon of flour to bring it back together.
Once butter, sugar and eggs are combined, add flour with the mixer set at low speed, until just incorporated. Using the rubber spatula, fold through the batter to make sure everything is well combined.
Transfer the batter to the lined tins and gently spread towards the edges with a step palette knife. The mixture should be higher around the edges of the tins than in the centre, to ensure an even bake and level cake height.
Bake for 20-25 minutes. The sponges are cooked when they spring back to the touch and the sides are coming away from the edges of the tin. You could also insert a clean knife into the middle of each sponge; if they are cooked, the knife will come out clean.
While the sponges are in the oven, make a lemon sugar syrup following the instructions below, but replacing the water with lemon juice.
Once the sponges are baked, remove from oven and allow to rest for about 10 minutes. Brush the tops of the sponges with lemon syrup (reserving some for the assembling stage and storing it in the fridge overnight).
Once just warm, run a knife all the way round the sides of the tins, remove the sponges and leave to cool completely on a wire rack.
Wrap the cooled sponges in cling film and leave to rest overnight at room temperature. This will ensure that all the moisture is sealed and the sponges firm up to the ideal texture for trimming and layering.
To make the raspberry meringue buttercream
Put the raspberry pur?e in a small saucepan, bring to the boil and simmer until reduced to half. Chill until cool.
Make the meringue buttercream following the instructions below.
Add a little meringue buttercream to the raspberry pur?e and mix until well combined.
Gently fold into the remaining meringue buttercream and add the raspberry extract to taste. If the mixture splits, whip it with an electric mixer until smooth.
To assemble the cake
Trim the three sponge layers, soak with more lemon syrup, and sandwich together using some of the raspberry meringue buttercream. If you wish to recreate the cake shown on the front of the book, sprinkle the rose petal fragments between the layers. For full instructions on how to trim and layer your cake, see below.
Use meringue buttercream to mask the top and sides of the cake (see below).
To decorate
Generously sprinkle the rose petal fragments over the top of the cake. If you are recreating the design shown on the cover, decorate the top of the cake using the stencil and a good dusting of icing sugar, then pipe small rosettes of raspberry meringue buttercream around the edge and finish with fresh raspberries.
Peggy’s basic tool kits:
Baking tool kit
1. Electric mixer with whisk and paddle attachment 2. Selection of cake tins and baking trays 3. Rubber spatula??4. Selection of bowls and jugs??5. Selection of large and small fine sieves 6. Kitchen scales 7. Greaseproof paper 8. Step palette knife 9. Pastry brush 10. Scissors??11. Wire cooling rack 12. Small kitchen knife 13. Whisk??14. Oven gloves??15. Measuring spoons 16. Cling film??17. Oil spray
Layering tool kit
1. Long serrated knife or cake leveller??2. Ruler that measures in inches??3. Cake boards in various shapes and sizes 4. Small, medium and large palette knives 5. Non-slip turntable??6. Metal cake disc??7. Metal side scraper??8. Selection of piping bags (such as paper, plastic and textile with screw attachment) 9. Assortment of metal piping nozzles (different sizes of round and star nozzles)
Sugar Syrup
If you bake regularly at home, it’s a good idea to keep a supply of simple sugar syrup in the fridge. I swear by it, as I use it to add moisture and flavour to most of my cakes. Brushing the top of a sponge with syrup just after baking prevents it from forming a dry, hard crust than can spoil the cake. Doing this while the sponge is still warm allows the syrup to absorb more quickly than if the sponge has cooled. For flavoured syrup, infuse the syrup with the flavouring as early as possible before use, to allow the flavours to develop fully.
Makes about 200ml
INGREDIENTS
150ml water
150g sugar
METHOD
Place the water and sugar in a saucepan, stir well and bring to the boil. Allow it to cool down. When lukewarm, add the flavourings. Store the sugar syrup in the fridge if not using immediately. It will keep for up to 1 month.
Meringue Buttercream
Meringue buttercream is very light and smooth with?a relatively pale colour. It is more delicate than English buttercream and suits lighter sponges, such as chiffon cake. It can split easily if overworked or mixed with acidic ingredients or those with a high fat content, such as ganache. Always add other flavours very carefully, folding them through gently. Should the buttercream split, you can bring it back by whipping it at high speed (unless it is mixed with a filling containing a high fat content). Cakes filled with meringue buttercream should always be stored in the fridge because of the egg content.
Makes enough meringue buttercream to layer one 15cm cake
INGREDIENTS
270g caster sugar
67ml water
135g egg whites, fresh or pasteurised
330g butter, softened
METHOD
Place sugar and water in a small saucepan over a medium-high heat and bring to a rapid boil.
Place egg whites in the bowl of an electric mixer and whip at low speed, using the whisk attachment, until frothy.
When the sugar syrup reaches 121?C, with the mixer running, pour it directly over the meringue in a thin, steady stream. Take care not to pour any of the syrup onto the whisk or the sides of the bowl.
Whip the meringue until cool to the touch; this could take several minutes. With the mixer running, add the butter a couple of tablespoons at a time. Keep beating until the buttercream is completely smooth and spreadable, then fold in any additional flavourings.
Meringue buttercream will keep for up to 1 week in the fridge.
Layering Technique
These instructions are a general guide to trimming and layering; the process will vary slightly from one recipe to another. Make sure all the sponge layers have cooled completely before assembling. Ideally, wrap them in cling film and leave to rest overnight. Any buttercream, ganache or other fillings should be spreadable. Ensure that?they are room temperature before use.
1 Using a bread knife or cake leveller, trim the top crust off each sponge. For the middle layer (or layers), also trim off the browned base of the sponge. Aim to make all the sponges the same depth – to help with this,
I use a ruler when adjusting my cake leveller. After trimming, brush the crumbs off the sponge cakes, as they can make masking very difficult and spoil the filling.
2 Stick a cake board in the centre of the cake disc using buttercream or ganache, then place the disc on a non-slip turntable (optional). Spread the cake board with a thin layer of buttercream or ganache and stick the first cake layer on top (brown side downwards). Use a pastry brush to soak the top of the sponge with sugar syrup, if required.
3 If the filling is different to that which will be used to coat the outside of the cake, put some of the outer coating mixture in a piping bag and pipe a ring around the edge of the layer. This will form a barrier to hold the filling inside.
4 Use a palette knife to spread the filling over the bottom layer.
5 Spread out the filling evenly, making sure it goes right to the edges (or meets the ring applied in step 3). Be careful not to use too much filling; if applied too heavily, the filling will ooze out around the sides when the next sponge layer is put in place.
6 Place the next sponge layer on top and add more sugar syrup if required.
7 Repeat steps 3?5. If your cake has more than three layers, repeat these steps until you just have the top layer left to add.
8 Position the final layer on top, brown side upwards.
9 Once all the layers are assembled, gently press on the top layer to release any trapped air bubbles. Make sure the top is level. Soak the final layer with sugar syrup if required.
Masking Technique
To achieve a beautifully masked layer cake, it is important to have the right equipment (see tool kits, above). I also recommend having a damp cloth to hand, to clean the edge of your palette knife and side scraper as you work. Your frosting should be spreadable and lump free, and ensure that it is at room temperature before use. You will need to mask any cake twice to achieve a smooth finish and straight edges; however, you can repeat the process until you are happy with the result. Do bear in mind that you will need to chill the cake after each coat, to set the frosting. Use a separate bowl for the crumb coat, to avoid spoiling the frosting for the final coat.
1 Begin by applying a crumb coat. This will hold the sponge surface in place and provide a good basic shape with which to work. Using a palette knife, pile a generous amount of buttercream or ganache onto the top layer of the cake.
2 Working from the centre, spread the mixture towards the edges of the cake and down the sides.
3 As you spread the mixture around the sides, work your palette knife in a backwards and forwards motion, rotating the turntable in the opposite direction to the way that you’re spreading.
4 Ensure that the cake is completely covered and that there are no gaps around the sides.
5 Place the side scraper on the far side of the cake, with the long straight edge against the cake at a 45? angle and the bottom of the side scraper sitting flat on the disc. Place your spare hand on the disc and the turntable, as close to your other hand as possible.
6 Rotate the turntable against the direction of the side scraper, smoothing the frosting until your hands meet at the front.
7 If there are still a lot of cracks or gaps in the frosting, repeat the side-scraping process. Once you are happy with the coating, lift off the side scraper and then clean it with the palette knife.
8 Use a palette knife to make the top of the cake smooth and neaten the edges.
9 Use the side scraper and the palette knife to remove any excess mixture.
Leave the cake to chill in the fridge for at least half an hour, then repeat the crumb coat if necessary, until you are happy with the shape.
Chill the cake again, until it is set.
To apply the final coat, repeat steps 1?9 using a fresh, crumb-free batch of buttercream or ganache. Aim for a perfectly level top and straight sides with sharp edges, to achieve the best result.
When you are satisfied with the final coat, put the cake back in the fridge for about 1 hour, or until the buttercream or ganache has set. Then apply any finishing touches.
Extracted from?Love Layer Cakes by Peggy Porschen (Quadrille, approx €28), out now.
Want to see how Peggy does it? Watch the video at?https://www.youtube.com/watch?v=rZVmCLvN-38


Also Read